|
|
|
UER Store
|
|
sweet UER decals:

|
|
|
 General Zod
    
Location: Provvy-Prov, Rhode Island
Gender: Male
Total Likes: 337 likes
www.mycophagia.c om
 | |  | |  | |  | |  | Re: Light Painting advice
< Reply # 2 on 1/24/2015 5:13 AM >
| Reply with Quote
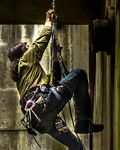
| | | It's pretty simple really, but if you want okay light there are a few things to keep in mind:
1) Keep the shutter open for a while, maybe even 20-40 seconds, giving you enough time to paint the entire scene from several different angles. Of course, the longer the shutter is open, the dimmer or less frequent your light painting should be, (or just use a smaller aperture) otherwise you'll wind up with an over-exposure.
2) Make sure to use quality, full spectrum light which is not limited to cheapo LED flashlights. Those tend to produce very crappy results from very crappy light.
3) Don't light things head on from straight behind the camera. Use studio lighting techniques instead, bringing light in from the sides, overhead, below, and behind. This can be done handheld, with stationary light sources, or both.
4) Attempt to create atmospheric light, not just a subject lit by direct or diffused light.
5) Consider using a remote flash.
6) Color temperature is important, especially when using multiple light sources and intensities.
|
Rise before Zod
Kneel before Zod
www.mycophagia.com |
|
sirpsychosexy

Location: Netherlands
Gender: Male
Total Likes: 396 likes
| | | | Re: Light Painting advice
< Reply # 5 on 1/24/2015 12:53 PM >
| Reply with Quote
| | | Some more tips from my own experience:
Consider diffusing your light to avoid light streaks. There are tons of cheap ways to do that. I use brown baking paper to change the LED's dirty colour temperature and make 'adapters' from toilet paper rolls. They're almost always on my flashlights except in huge places where a LOT of light is need, they do block a bit of light. Another big advantage with the diffusors is that you don't necessarily have to 'paint', you can just put the flashlight somewhere around a corner and it will look good. So when you're on your own or just don't want to bother your friends, you can still create endless combinations with a couple of flashlights.
Contrary to what I said above, don't be afraid to walk through your composition while the shutter is open, but keep the light hidden at all costs. Keep your body in between the flashlight and the camera. This will make you walk in very weird ways, you'll probably break a leg or two and your friends will all laugh at you, but it's worth it. When I'm running around like a ninja with down's syndrome I usually keep my hand over the flashlight letting only enough light through for me to see where I'm going, while the camera won't capture much of it. So I paint from around a corner somewhere for maybe 5 secs, run to somewhere else, paint 5 secs again, run again etc. I often combine it with the first method of stationary lights too.
Lastly, take the same photo multiple times. Have a look at the LCD to see what you want to change and do it again, but don't delete the earlier photos. Even when you paint almost the same there's always one that sticks out as the best. Sometimes it's the one you considered to be bad on the spot, the tiny LCD won't give you an accurate representation.
This is all kind of focussed on natural looking lighting. If you want weird photos, do weird stuff. Experimenting is always fun.
|
www.basdemos.com |
|
|
| This thread is in a public category, and can't be made private. |
|
All content and images copyright © 2002-2024 UER.CA and respective creators. Graphical Design by Crossfire.
To contact webmaster, or click to email with problems or other questions about this site:
UER CONTACT
View Terms of Service |
View Privacy Policy |
Server colocation provided by Beanfield
This page was generated for you in 156 milliseconds. Since June 23, 2002, a total of 739687413 pages have been generated.
|
|