|
|
|
UER Store
|
|
sweet UER decals:

|
|
|
|
Activity
|
|
920 online
Server Time:
2024-05-07 23:16:05
|
|
|
 G.U.
   
Location: Sudbury/Meaford, ON Canada QC
Gender: Male

Get your F****** towel ready.
 | |  | Few Rookie Photoshop Basics
< on 5/21/2009 9:04 PM >
|  | | | Hey guys..
Some cool suggestions for a quick and easy boost to your pics...For those that are new like me 
So I've been on UER for 4 Months or so now and I find it an excellent resource...
I've been exploring much longer, but not taking pictures.
I find the photography angle very interesting and have learned a lot in a very short time. I feel inclined to share what I have learned so far. These techniques are pretty basic but create some cool effects...I will do a few as I have time to write them up. This is all stuff I have either read on an external site or asked family and friends about. Here is the first of them:
Gaussian Overlay
This one's kinda cool, but I know not everyone likes it...
Begin by right clicking the Background Layer > Duplicate Layer
I've learned you should always do this before you start modifying.
Another layer will appear, this is the one you will be modifying. Ensure that it is selected then look above to find Filter > Blur > Gaussian Blur.
Select this and move the slider until the Image is blurred, but the main shapes are still visible. I've noticed that too much blur creates too much contrast and makes it darker than what I usually want.
Once you make this adjustment look on the right hand side and notice "Opacity" and to the left of that a selection box where it says "Normal"
Change the "Normal" value to "Overlay" or "Soft Light" or whichever of those values you feel looks best
Play with "Opacity" to take the edge off this effect, perhaps about 50-60% but it really depends on the image...
Select both layers at the same time > right click > Merge layers!
Your done with this, and can continue modifying or leave it as is!
Feel free to try it and post your before and afters!
I wouldn't mind see some good examples of this!
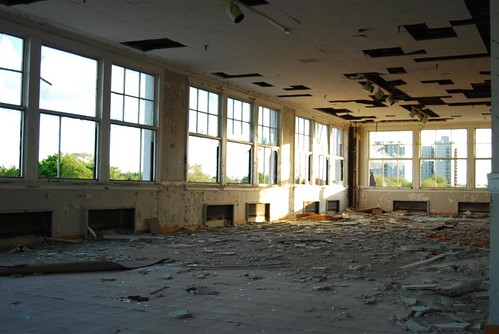
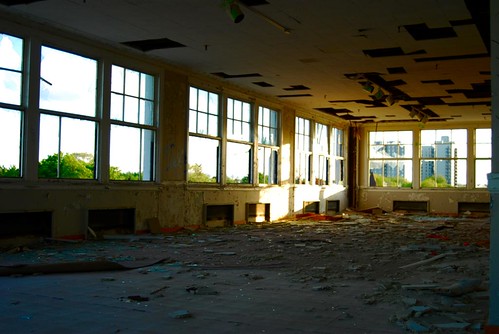
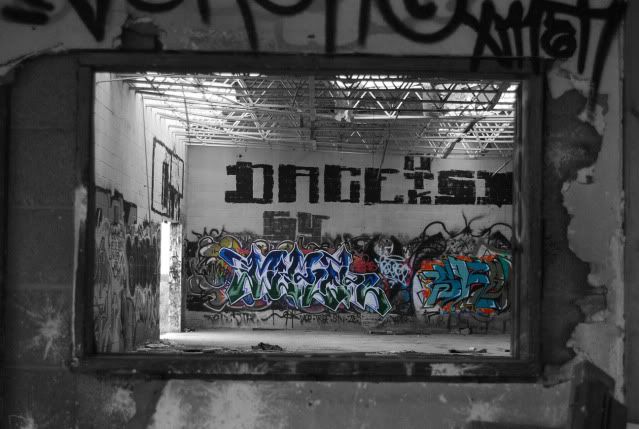
Before:
After: Notice a bit of a glow and a much more noticeable contrast.
[last edit 5/29/2009 3:18 AM by Agent Skelly - edited 2 times]
~"Why did the geologist take his girlfriend to the quarry? She wanted to get a little boulder, and He wanted to get his rocks off."~ ~When your hands are tied, Kick...Ass ~ My Flickr! |
|
Intrinsic
    
Location: Collingwood
Gender: Male
| | Re: Few Rookie Photoshop Basics
<Reply # 1 on 5/21/2009 11:53 PM >
| | | | I also have one to offer...
Same principle:
1) Right click, duplicate layer
2) Go to layers window and select Overlay
3) Go to second layer and press Control-shift-U (black and white mode)
This makes the layer b&w while the original image remains colour.
Before:

After:

By experimenting with overlay styles (eg. overlay, soft light) and turning the second layer to B&W, you can make the image appear a little less bright, more clear and somewhat aged. I call it the "msgsudz look" because I find the result closely resembles his style of photos.
Edit: my example doesn't show the full effect because the original image was already post-processed using this method.
[last edit 5/21/2009 11:54 PM by Intrinsic - edited 1 times]
|
|
G to the Race

Hi!
| | Re: Few Rookie Photoshop Basics
<Reply # 2 on 5/21/2009 11:55 PM >
| | | | Hey, thanks for this. You should keep doing these--photoshop is intimidating for new users, I use online tutorials but still need all the help I can get. It's a powerful tool that used correctly can really enhance a graphic utterance. Nice job being a good person.
You betcha |
|
G.U.
Location: Sudbury/Meaford, ON Canada QC
Gender: Male
Get your F****** towel ready.
| | Re: Few Rookie Photoshop Basics
<Reply # 3 on 5/21/2009 11:56 PM >
| | | | Simple Vignette Effect.
While frowned upon when it actually happens with a shitty lens...
It creates kind of a nice border!
Go to Layer > New layer
Select a box around the inside of that new layer image, as big as you want the vignette effect to come into the picture.
Right click > Feather
It will ask you to input a value, for a picture right off the camera try 200. This value depends on the resolution of the image...if it's too much change it.
Once it creates the rounded corners Right Click > Select Inverse
Now find the paint bucket tool on the left and click on the outside (Now Selected) area.
Now the image is surrounded by a Vignette effect but is likely horribly strong!
Look for "Opacity" on the far right side and modify that as needed.
Select all your layers > Right click one of them > Merge Layers
Original:
As a subtle vignette:

As a Border:
Your done.
~"Why did the geologist take his girlfriend to the quarry? She wanted to get a little boulder, and He wanted to get his rocks off."~ ~When your hands are tied, Kick...Ass ~ My Flickr! |
|
G.U.
Location: Sudbury/Meaford, ON Canada QC
Gender: Male
Get your F****** towel ready.
| | Re: Few Rookie Photoshop Basics
<Reply # 4 on 5/22/2009 12:03 AM >
| | | | Intrinsic, That one is great  I really like it for a cool contrast & desaturized look. I really like it for a cool contrast & desaturized look.
Stuff like Layer Masking is where it gets intimidating for a beginner, these are great places to start and where I really got comfortable with layers.
Thanks a lot man! If any intermediate users have ideas that helped them out along the way, post em up! Keep it SIMPLE remember!
No worries G race, I just know I wish someone had gone "hey this is easy and cool" when I started lol
Edit: Added a link up top to acquire photoshop Cs3 extended if you have a moderate PC, Search for CS4 if you want the newest version and have a quicker machine. If you have problems...Feel free to PM me
[last edit 5/22/2009 12:13 AM by G.U. - edited 1 times]
~"Why did the geologist take his girlfriend to the quarry? She wanted to get a little boulder, and He wanted to get his rocks off."~ ~When your hands are tied, Kick...Ass ~ My Flickr! |
|
G.U.
Location: Sudbury/Meaford, ON Canada QC
Gender: Male
Get your F****** towel ready.
| | Re: Few Rookie Photoshop Basics
<Reply # 5 on 5/22/2009 2:34 AM >
| | | | I forgot about this one...It's very straightforward. Mostly helps bring out a really simple and flat color.
LAB Color & Apply Image
As always, On the lower-right hand side right click your image and Duplicate it, creating an identical layer.
The next thing you want to do is go to IMAGE > Mode > Lab Color
You may receive a message, just click "Don't Flatten" when this occurs.
The box that pops up afterwards shows some complicated information that you will undoubtedly come across again at some point, but for now just click OK.
On the lower right just above your layers you will see "Opacity" again...Adjust that to around 60% or just whatever looks best.
Select both layers again, right click, then merge layers.
Go back to Image > Mode > RGB
This will return your image to it's original JPEG mode and allow you to save as a Jpeg again!
Before:
After:
~"Why did the geologist take his girlfriend to the quarry? She wanted to get a little boulder, and He wanted to get his rocks off."~ ~When your hands are tied, Kick...Ass ~ My Flickr! |
|
G.U.
Location: Sudbury/Meaford, ON Canada QC
Gender: Male
Get your F****** towel ready.
| | Re: Few Rookie Photoshop Basics
<Reply # 6 on 5/22/2009 2:48 AM >
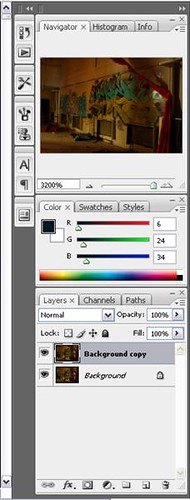
| | | | Layer Bar! This is what we are referring to when we talk about duplicating your 'Background' or Merging all your layers.
Also visible is the selection box for changing from 'Normal' to 'Overlay' or otherwise...and also modifying the 'Opacity' of a layer and it's effects.
~"Why did the geologist take his girlfriend to the quarry? She wanted to get a little boulder, and He wanted to get his rocks off."~ ~When your hands are tied, Kick...Ass ~ My Flickr! |
|
PhotoSeeker

Location: Sudbury
Gender: Male

MikeOnline
| |  | Re: Few Rookie Photoshop Basics
<Reply # 7 on 5/22/2009 3:18 AM >
| | | | One you can tinker with is to take your photo, duplicate layer, then desaturate the top layer completely.
Having done that, use the erase tool on a particular subject in the picture. This will erase the subject from the black and white layer, allowing the color to show through.
Example:

Lots of Urban Exploration goodness at https://urbexobsession.com |
|
G.U.
Location: Sudbury/Meaford, ON Canada QC
Gender: Male
Get your F****** towel ready.
| | Re: Few Rookie Photoshop Basics
<Reply # 8 on 5/22/2009 3:41 AM >
| | | | That's a great one! Thanks Photoseeker
Very simple one
You can desaturate by going Image > Adjustments > Hue&Saturation
Slide the saturation bar as desired...
Eraser tool is on the left side, after selecting you can change the brush size at the top! I find it REALLY helps to choose one of the sizes/brush styles that that look like blurred circles.
These brush types (works with eraser too!) make your adjustments and changes less harsh.
You can also change the 'opacity' of the eraser tool too!
~"Why did the geologist take his girlfriend to the quarry? She wanted to get a little boulder, and He wanted to get his rocks off."~ ~When your hands are tied, Kick...Ass ~ My Flickr! |
|
Wilk

Location: NYC
Gender: Male
| | | Re: Few Rookie Photoshop Basics
<Reply # 9 on 5/22/2009 4:06 AM >
| | | | Awesome thread idea G.U. this is some really helpful stuff for photoshop noobs such as myself.
Thanks to everyone for their tips.
[last edit 5/22/2009 4:16 AM by Wilk - edited 1 times]
Ready for liftoff
|
|
G.U.
Location: Sudbury/Meaford, ON Canada QC
Gender: Male
Get your F****** towel ready.
| | Re: Few Rookie Photoshop Basics
<Reply # 10 on 5/22/2009 5:35 PM >
| | | |
Looks awesome, and no worries.
This stuff is all a good start, pretty simple.
If anyone has tips for Photoshop beginners throw em up...
Just keep it simple and explain the shit out of it
~"Why did the geologist take his girlfriend to the quarry? She wanted to get a little boulder, and He wanted to get his rocks off."~ ~When your hands are tied, Kick...Ass ~ My Flickr! |
|
anathema
Gender: Female
| | Re: Few Rookie Photoshop Basics
<Reply # 11 on 5/22/2009 6:55 PM >
| | | | These are all good tips!
I like to do the same thing as Photoseeker, but instead of desaturated / color, I like to use a blur layer that I can erase away to leave some things crystal clear.
Of course, you can do that while shooting by using a short depth of field (like your macro lens) but this trick comes in handy when you don't think to do that in the first place.
You can also do a faux "tilt shift" (miniature) effect by leaving a narrow band of clear focus in the middle and adding blur at the top and bottom. If you can do this as a gradient, even better.
Here's an easy tutorial:
http://www.wired.c...5-10/st_howtoscene
"Innovation distinguishes between a leader and a follower." ~~Steve Jobs |
|
octopus7

Location: Melbourne, Australia
Gender: Male

| | | Re: Few Rookie Photoshop Basics
<Reply # 12 on 5/26/2009 10:30 AM >
| | | | wow! Thanks a ton for these tutorials guys, very much appreciated.
I have only ever used photoshop for making textures for 3D models, now i'm itching to try some of your techniques on some of my drain photos..cheers
Melbourne City Drain painters - We go in Drains!
"darkness is our canvas, light is our medium"
http://www.flickr.com/groups/mcdp |
|
Cochiseg
Location: Canada
Gender: Male
Scary rabbit, isn't it?
| | Re: Few Rookie Photoshop Basics
<Reply # 13 on 5/26/2009 9:36 PM >
| | | | usually all I do is play with colour balance, contrast, and curves then maybe I add filters


]
[last edit 5/27/2009 1:17 AM by Cochiseg - edited 3 times]
|
|
Lucifer
Location: Hamilton Ontario
| | Re: Few Rookie Photoshop Basics
<Reply # 14 on 5/27/2009 8:32 AM >
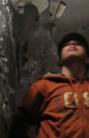
| | | | I like to
play with color and lighting to make shots look like creepy night vision ;)
My best selling prints (non UER related) have been those which are partially desaturated or color enhanced/distorted. I also do photo touching and airbrushing for kicks.
Just out of curiosity, does anyone else use Gimp?
I'm a linux junkie.
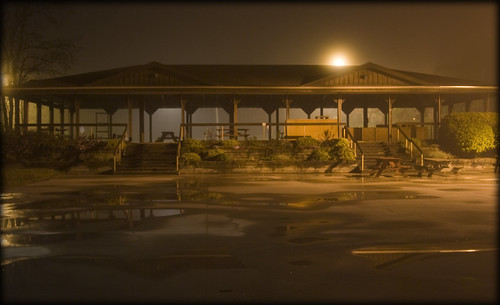
This is the last fun shot I did of a friend, at our last explore.
But the others are me playing with all these neat little tools on Gimp.
I have my other ones from my last explore up here somewhere at the old HJ hotel, thats where most of my new shots were taken. All I have until my digital gets back in the mail from leaving it in the damned rental car after doing the hermitage.
|
|
G.U.
Location: Sudbury/Meaford, ON Canada QC
Gender: Male
Get your F****** towel ready.
| | Re: Few Rookie Photoshop Basics
<Reply # 15 on 5/28/2009 8:33 PM >
| | | | Thanks Lucifer those are good starts, although I am going to have to disagree with GIMP. It's buggy and doesn't natively support RAW images which will undoubtedly be used by anyone making a progression in their photography.
The ONLY argument one could make is that it's free...but that is remedied by the link in my first post. Try Photoshop. I promise you will love it.
A word on Night Photography
I used to shoot a lot with a point and shoot camera, in fact I only recently got the DSLR I'm having so much fun with now (...and hence sharing everything I'm learning!). I did like tossing it in my pocket to make my way up a ladder, or not have to worry about being so tender with my equipment.
One of the main limits you encounter (almost immediately in UE photography) is shooting at night.
First of all, It's been said a million times: Get a tripod.
I've seen some pretty awesome old school reverse engineered rigs Used ones are cheap, and if your not picky you can find yourself -with- tripod very quickly and economically.
Besides that, know your camera settings. If you can adjust the AE (Exposure) try doing that. Some have specific modes for night or low light shots, do that also.
Experiment, Experiment, Experiment...
Unfortunately...If you can adjust the ISO you should do that also, on a p&s 400 will still be grainy. But acceptable given the circumstances.
The idea in both cases here is to force the camera into having the shutter open longer (Hence the need for the tripod as if you move it while it's "gathering data" it will be blurry.)
This will give you enough valuable time to use you flashlight to try and light up whatever you are taking a picture of!
Flashlight will also help you focus. Point the light in the middle of the view, press the button down halfway and you are set.
Again: Experiment x 10^5? (Well not that much, ok.)
This is the premise of light painting...mentioned many times on this site. Perhaps a search would reveal more.
Photoshop relevance:
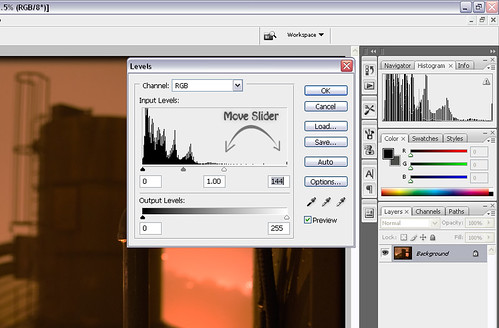
Don't be tempted to go to open Image > Adjustments > Brightness & Contrast Right away, there is one other option that can help with out washing out the whole image.
Open Image > Adjustments > Levels
You will see a "histogram" maybe somewhat like this one, Wherever there isn't black, there is "unusable" information...Like total darkness or total white perhaps. This is important still, but you can use levels to "cut out" some of that information without effecting the overall image too much. Which is always a goal to keep in mind. Just move it enough to get your pic that tad lighter if needed, Don't go into the black area...that's BAD. Mmmk?
Have fun! (Don't trip on anything in the darkness...It happens...)
~"Why did the geologist take his girlfriend to the quarry? She wanted to get a little boulder, and He wanted to get his rocks off."~ ~When your hands are tied, Kick...Ass ~ My Flickr! |
|
shotgun mario
Location: MSP
Gender: Male
MSP Elite™ Card-Carrying Member
| | | Re: Few Rookie Photoshop Basics
<Reply # 16 on 5/28/2009 10:59 PM >
| | | | a few quick tricks if you have a crappy camera like me that cannot capture what the environment looked like...
duplicate the layer so that you're not modifying the original- photoshop has a limited amount of undos!
If you have a crappy tripod like me, your photos are probably off-balance. To fix this, I crop a few pixels from the outside of the image.
First I turn on my rulers located under VIEW. Then with the move tool, I click on a ruler and pull out a cyan guideline and slide it over the image. Using both the horizontal and vertical lines, I determine how the photograph has to be adjusted. Then I go to EDIT > FREE TRANSFORM, which will allow me to rotate and scale the image. If you want to get fancy, go to EDIT > TRANSFORM, where you can play with the perspective, skew, and warp to counter or enhance visual perception in the image. When you're done, with guidelines, box in what you want of your final image crop to be (don't allow any of the translucent of the image to be inside the crop box [the checkerboard background]). Once you've got it all boxed in, use the crop tool and allow it to snap to all corners of the box built out of guidelines and press enter. once that's done, simply slide the guidelines off the screen with the move tool.
Once you've got your image cropped, you can enhance how it looks to fix any problems that shouldn't be there.
my favorite things to play with are under:
image > adjustments....
brightness/contrast
-adjusts the brightness of an image and the balance between dark and light image. Quick and simple, a slight change to the contrast can really make the image pop or flatten. Brightness can be adjusted, but can negatively effect the other end of the brightness scale of the image if used to strongly.
Hue/Saturation
-Can adjust the color saturation of an image, shift the color wheel, or darken or lighten an image. All 3 are quick and dirty, giving less-than-spectacular results that can be achieved easier other ways, but are very straightforward.
selective color
-with selective color, if your camera has an odd balance of color, using this can help correct it. Not as precise as channel mixer, and can cause some color edges to form, but it is quick and straightforward. Works on a CYMK scale.
channel mixer
-This allows for the light to be balanced if the camera is off. Much more precise than selective color. Works on a RGB scale.
exposure
-allows the photo to be adjusted with mock-exposure. It doesn't work very well for removing exposure, but it's nice if your show was underexposed. I don't suggest adjusting the offset unless you want some crazy stuff, but exposure with the gamma to counter any icky changes works nicely.
shadow/highlight
-with this tool, you can adjust the balance of light in the picture. This is a very useful tool IMO if you have a crappy camera. I'd suggest 'showing more options' as then there is the midtone contrast and color correction as well. Shadow slider will brighten the darker parts of the photo, while highlights will darken the brighter parts. I wouldn't touch the tonal width or radius for either of them. color correction can add/remove color without overpowering like the saturation control can, and midtone contrast can help make the image 'pop' or 'flatten' by shifting the blend towards the brighter or darker end of the spectrum
if you've taken photos in colored light conditions, you can slightly counter it by decreasing that light color with the selective color tool, and then increasing the color correction (but no highlight/shadow/midtone adjustment) which will slowly bring out the other colors and repress the overbearing color. Repeat this several times and the image can begin to look more natural- but beware of image decay, as the more you bring out the repressed color, the less data you're actually working with, to the point that it may become grainy, or unnatural looking.
using all of these tools to varying degree, you can greatly restore your images to what the environment was that you took it in, or what you'd prefer the images to be like.
If you want to protect the locations you love to explore, don't talk about them online in public!
If you want to make exploring friends, send people private messages! Meet up in real life! Get off the internet!
Don't try to have a UER e-penis! You won't impress anyone! This especially means you, Minneapolis MN newbies! |
|
wormazz
Location: Daugai, Alytus, Lithuania
Gender: Male

black bastard
| |  | |  | |  | | | Re: Few Rookie Photoshop Basics
<Reply # 17 on 5/28/2009 11:23 PM >
| | | | Posted by Lucifer
I like to
play with color and lighting to make shots look like creepy night vision ;)
My best selling prints (non UER related) have been those which are partially desaturated or color enhanced/distorted. I also do photo touching and airbrushing for kicks.
Just out of curiosity, does anyone else use Gimp?
I'm a linux junkie.
This is the last fun shot I did of a friend, at our last explore.
But the others are me playing with all these neat little tools on Gimp.
I have my other ones from my last explore up here somewhere at the old HJ hotel, thats where most of my new shots were taken. All I have until my digital gets back in the mail from leaving it in the damned rental car after doing the hermitage.
|
I'm Linux user too, and always using GIMP.
Some tutorials is here:
http://www.tutoria...m/tutorials/Gimp/1
http://www.gimpguru.org/Tutorials/
http://gimp-tutorials.net/
http://www.gimp-tutorials.com/
http://tutorialblog.org/gimp-tutorials/
http://www.ghuj.com/
and here http://www.noupe.c...and-resources.html
---
And...If you don't like GIMP, you can always try Paint-Mono. It's a Paint.NET port for Unix systems. http://code.google.com/p/paint-mono/
---
Photoshop is good thing, but it's closed-source and NOT works with operating systems like Linux, Solaris or BSD...It's really very sad.
Need friends :( |
|
micro

Gender: Male
Slowly I turned
| | Re: Few Rookie Photoshop Basics
<Reply # 18 on 5/29/2009 12:34 AM >
| | | | Do's:
- F1
- Google
- Curves and/or Levels
- Colour Balance
- 16 bit editing if possible
- Adjustment layers
- PTlens
- Photoshop RAW converter
- Layer masks
Don'ts
- Fake vignetting that looks fake
- Selective colouring
- Gaussian blurs
- Menu > Filters > Artistic/Brush Strokes/Stylize/Render
- Creative border plugins
- Anything else that makes use of the term "creative"
- Things that make your photos look totally cool when stoned
- HDR (see above point)
[last edit 5/29/2009 12:35 AM by micro - edited 1 times]
|
|
G.U.
Location: Sudbury/Meaford, ON Canada QC
Gender: Male
Get your F****** towel ready.
| | Re: Few Rookie Photoshop Basics
<Reply # 19 on 6/2/2009 6:41 AM >
| | | | Posted by micro
Do's:
- F1
- Google
- Curves and/or Levels
- Colour Balance
- 16 bit editing if possible
- Adjustment layers
- PTlens
- Photoshop RAW converter
- Layer masks
Don'ts
- Fake vignetting that looks fake
- Selective colouring
- Gaussian blurs
- Menu > Filters > Artistic/Brush Strokes/Stylize/Render
- Creative border plugins
- Anything else that makes use of the term "creative"
- Things that make your photos look totally cool when stoned
- HDR (see above point)
|
If you're feeling creative and are stoned out of your mind, Look up a program called "Photomatix" there is a trial floating around out there that is awesome for Tone Mapping and Generating HDR (High Dynamic Range, Merging more than one captured exposure over several photos taken)
Try it all out, if you don't like how it looks click exit, and don't save it 
~"Why did the geologist take his girlfriend to the quarry? She wanted to get a little boulder, and He wanted to get his rocks off."~ ~When your hands are tied, Kick...Ass ~ My Flickr! |
|
|
|
All content and images copyright © 2002-2024 UER.CA and respective creators. Graphical Design by Crossfire.
To contact webmaster, or click to email with problems or other questions about this site:
UER CONTACT
View Terms of Service |
View Privacy Policy |
Server colocation provided by Beanfield
This page was generated for you in 125 milliseconds. Since June 23, 2002, a total of 740972701 pages have been generated.
|
|