|
|
|
UER Store
|
|
 order your copy of Access All Areas today!
|
|
|
 Abby Normal
   
Location: Las Vegas
Gender: Female

 | |  | |  | Re: Shooting in low light, or no light conditions.
<Reply # 20 on 4/10/2013 3:31 AM >
|  | | | The thing about low light photography is that it does take some practice to get the swing of it. After shooting for a while you start to develop a feel for what exposure is necessary in a given setting. I would suggest you practice shooting around your neighborhood at night before you head out to a cool site that you really want to capture.
Just my 2¢ worth...
Abby Normal
"Government is not a solution to our problem, government is the problem." Ronald Reagan |
|
DrWindyNibbles
Location: North Orange County
Gender: Male

"For if you forgive others their trespasses, your heavenly Father will also forgive you"
| | | Re: Shooting in low light, or no light conditions.
<Reply # 21 on 4/10/2013 4:17 PM >
| | | | Posted by Abby Normal
The thing about low light photography is that it does take some practice to get the swing of it.
Abby Normal
|
Agreed!
[last edit 4/10/2013 4:17 PM by DrWindyNibbles - edited 1 times]
DO NOT READ THIS! |
|
GreenCross
Location: Wisconsin
Gender: Male

| | Re: Shooting in low light, or no light conditions.
<Reply # 22 on 4/11/2013 9:28 AM >
| | | | I'm basically going to be reiterating what has been said here already, but since low light photography is my niche I figured I would throw in my 2 cents:
In low light/no light situations, it is impossible to take even a semi decent photograph without stabilizing your camera. Why?: Because the Shutter Speed required to take such a picture will register even the slightest movement during the relatively long amount of time the shutter needs to stay open to complete the exposure. This will likely result in a blurry photo filled with light artifacts. Even if you think you have the steadiest hands in the world,the muscles in your arms and legs make minor adjustments to keep the Camera level and on target and these miniscule movements will blur the image; even the moment you depress the shutter release you will create movement that could potentially ruin your photograph.
So how do you achieve decent results in these low light/night/no light situations?
(Disclaimer, This advice is assuming that you have a DSLR and set your Shutter Speed and F-Stop(Aperture) manually. If you do not, to achieve nice results I suggest you purchase a decent DSLR with a wide ISO range and either take some lessons, or read up on how to do Photography) [Oh and Film SLR cameras are great too, but that is a whole different ball game]
1. Tripod- This is the most important piece of equipment sans your camera that you need to take photos in low light. I never take a picture without a tripod if I am shooting with a shutter speed of 200 or less, because at that point the risk of blurring becomes a more pressing issue. Some people like to crank up the ISO in these particular situations, and that works out fine, but the photo will end up being more grainy and less crisp than it could have ended up with a tripod. So, in short, the tripod, when setup will provide a stable base for your camera, so you can leave the camera alone while it exposes to ensure a clear exposure.
2. Remote Shutter Release- The Remote Shutter Release is not completely necessary, but will save you time and effort in the long run. The Remote Shutter release attaches to your Camera via a cable and when you have your photo all set up,you click the remote release and the shutter will open as it normally would. This ensures no extra movement from pressing the shutter release on the body of the camera. Alternative Solution: If you don't want to spend the extra bones on a remote shutter release (although I would suggest getting one) all you have to do is set the timer on your camera, press the shutter release and as the timer counts down, make sure everything is zeroed in and step away while the camera operates the shutter by itself.....this also achieves the same goal of keeping your shaky finger off of the shutter release and you take the photo!)
3.Flash/Flashlight/Strobes/Shop Lamp's etc, etc.
Depending on the results you want or how dark the area you want to photograph, you may need to bring your own source of lighting. Most cameras have a built in Flash, or you can buy a auxiliary flash to use as well. Mastering Flash is a whole different subject and can be complicated at times, so check out some tutorials online! Otherwise, you can use a flashlight or bring portable lamps with you to provide the light you need......but you also need to consider how much you want to lug around with you, how you are going to negotiate the terrain with all of your equipment, battery's etc.
4. ISO- Adjusting your ISO to lower speeds will give you a much more clear and crisp photo than shooting and higher film speeds. In low light photography, it is important to catch clear and crisp details that the naked eye might not catch at night(this is arguable of course). This will result in a longer exposure, but you will be thankful for the wait when it results in a clear and not grainy photo. Try shooting at 100 or 200 ISO and see what you think. But don't hesitate to shoot at higher ISO's to compare and use what you feel is best for your style.
5. Editing- Although there is some exception to the rule, most people throw their photos into Photoshop when they come home, just like bring your film to the dark room to make edits. Some of the best low light photographs out there have most definitely been edited, although I personally embrace the challenge to do most of my work "in-camera" I certainly clean up, and adjust some of my pictures as necessary. Taking low light photos at a variation of exposures and merging them together in Photoshop can also give you dramatic effects.
Final thoughts:
Photography is a hobby practiced by many people, and many people on this site practice it. There are many different opinions on how to go about doing things and everyone learns their craft differently and from different people with different opinions. The advice above comes purely from my experience as a photographer and you should be aware that there are other opinions and ways to go about doing things. But this is just to help you get started! Learn from your own experience and the experience of others!
There are many other things that go into low light photography, such as Saturation Levels, White Balance adjustments depending on the kind of lighting and types of lights in the areas, etc etc. You can find more about that stuff all over the internet! Good luck!
[last edit 4/11/2013 9:36 AM by GreenCross - edited 2 times]
|
|
Abby Normal
Location: Las Vegas
Gender: Female
| | | Re: Shooting in low light, or no light conditions.
<Reply # 23 on 4/12/2013 3:54 AM >
| | | | Posted by GreenCross
<snip some really good stuff>
Final thoughts:
... Learn from your own experience and the experience of others! ...
|
Good advice GreenCross!
Theresbeautyindecay, when you are browsing through the photos on this site do you stop and ask yourself, "How did the photographer capture that image?" or "Why do I like that image more than any of the others she took?" There are some really good photographers on this site who share their photos. Critically analyzing the composition, angle, exposure, and zoom will help you with your own shots. There is a lot to be learned by looking at good photography...and bad photography as well.
Digital cameras are a mixed blessing. If a photographer is serious about developing technique, he/she can shoot a lot of digital photographs without any real cost. That's the benefit. The down side is because there is no "per photo" cost, some people lose incentive to work on their skills. They just point the camera every which way and hope something good comes out of it.
If you are serious about developing your low-light skills, take along a notebook write your thoughts and technical details of each photograph. Notate ISO, aperture, shutter speed, and any flash settings you might use. This method has two advantages; it make you concentrate a bit more about each aspect of the photograph before you push the button, and it documents the image settings for when you are back on the computer reviewing the images.
Like any other skill in life, practice leads to improvement.
Abby Normal
"Government is not a solution to our problem, government is the problem." Ronald Reagan |
|
billmclaugh

| | | Re: Shooting in low light, or no light conditions.
<Reply # 24 on 5/28/2013 5:01 PM >
| | | | Posted by GreenCross
2. Remote Shutter Release- The Remote Shutter Release is not completely necessary, but will save you time and effort in the long run.
|
I have a few remotes (including a Promote) but in lieu of, you can also set your camera to, generally, 2 or 10 second timer mode. That way there is no slight reverberation from manually depressing the shutter button.
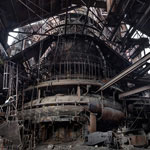
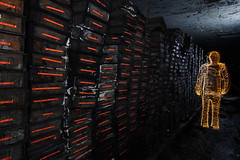
Here's one from inside a tunnel, with tripod and remote fired.
1.

[last edit 5/28/2013 5:03 PM by billmclaugh - edited 1 times]
"Once more unto the breach ... " |
|
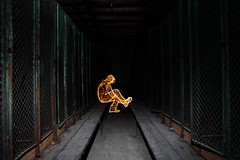
Furious D
   
Location: Northern Ontario
Gender: Male
The Night Time is the Right Time
| | Re: Shooting in low light, or no light conditions.
<Reply # 25 on 5/30/2013 12:46 AM >
| | | | Along with what's been mentioned already...
1. If you are shooting at ISO 100 and f/5 (how I usually shoot), you can get away with pointing a small flashlight at the roof to faintly light up a room you are working in. There's nothing worse than losing your situational awareness in the dark.
2. Wear some fricken steel toe boots with a thick sole. You can't see, and will likely step on a nail at some point. (I've seen it happen twice) Heavy work boots have saved my feet many, many times.
3. Set your focus manually, using live view. By placing a flashlight beside where you want your focus point, you can zoom in on the flashlight bulb in live view and set the focus perfectly. Keeping the focus on manual also prevents you from losing the focus between exposure attempts.
4. If you are using a flash, keep your thumb over the 'pilot' light at all times. There's nothing dumber looking than a small red streak randomly in your image.
5. Sometimes when working far from the exposing camera it helps to hand a tiny light on the tripod, just to help you know where the camera is in relation to you.
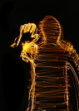
6. Try to use light painting techniques to emphasize a subject. Avoid the temptation of making the light-painted swirls your subject alone.
7. Before you start going crazy with the light painting, take the time to plan your steps, scope out the area and assess any dangerous spots. If you are going to fall through a floor, or down some steps, or trip on something, it will likely be in the dark.
As with anything, it gets easier and better with practice. Most of light-painting is trial and error and a shit-ton of patience.
PM me if you have any more questions. I've been doing this for years.
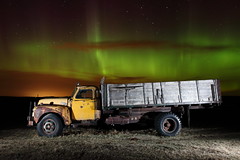
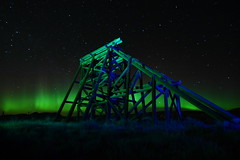
Here's my Night Work set:
http://www.flickr....72157624640053939/
"The time of getting fame for your name on its own is over. Artwork that is only about wanting to be famous will never make you famous. Fame is a by-product of doing something else. You don't go to a restaurant and order a meal because you want to have a shit."
-Banksy
The work of FuriousD: https://www.flickr...photos/opdendries/ |
|
collectivesoul
| | Re: Shooting in low light, or no light conditions.
<Reply # 26 on 5/30/2013 12:54 AM >
| | | | How necessary are eyepiece shutters/covers during long exposures?
|
|
Furious D
Location: Northern Ontario
Gender: Male
The Night Time is the Right Time
| | Re: Shooting in low light, or no light conditions.
<Reply # 27 on 5/30/2013 2:13 AM >
| | | | Posted by collectivesoul
How necessary are eyepiece shutters/covers during long exposures?
|
The eyepiece covers are there to prevent light from entering through the viewfinder (usually because your face is away from the viewfinder during tripod work). Eyepiece covers are not really necessary at night, but during the day they might make a difference in image quality. I have never used one on my camera.
They are there to prevent any light leakage, but on most modern cameras, that's hardly a problem.
"The time of getting fame for your name on its own is over. Artwork that is only about wanting to be famous will never make you famous. Fame is a by-product of doing something else. You don't go to a restaurant and order a meal because you want to have a shit."
-Banksy
The work of FuriousD: https://www.flickr...photos/opdendries/ |
|
changes

| | Re: Shooting in low light, or no light conditions.
<Reply # 28 on 6/15/2013 6:43 AM >
| | | | This is an awesome thread -- thank you to everyone for all the helpful tips! I hadn't thought much about setting the ISO before and how it affects the photograph. Most of my photography experience was with film and SLR so I'd just shoot whatever film I had on hand. Never thought much about the ISO setting when I first started playing with digital...
|
|
|
|
All content and images copyright © 2002-2024 UER.CA and respective creators. Graphical Design by Crossfire.
To contact webmaster, or click to email with problems or other questions about this site:
UER CONTACT
View Terms of Service |
View Privacy Policy |
Server colocation provided by Beanfield
This page was generated for you in 171 milliseconds. Since June 23, 2002, a total of 739325175 pages have been generated.
|
|