|
|
|
UER Store
|
|
sweet UER decals:

|
|
|
 metawaffle
      
King of Puns
Location: Brisbane!
Gender: Male
Total Likes: 19 likes

Purveyor of Fine Lampshades
 | |  | |  | |  | The Photo Dissection Thread
< on 3/8/2009 3:19 AM >
| Reply with Quote
| | | A certain board member who's name shall not be revealed is just getting into night and underground photography. Anyway, so Rob666 had the idea of a thread for curious people to ask how the lighting in particular shots was achieved. Now, some people might well not want to give up their hard-earned secrets, which is perfectly alright. Personally, I'm of the opinion that having to explain things gets me thinking usefully about aspects that I might otherwise gloss over. Besides, someone will always come along later and do it better, regardless  So, I suggest we work things like so: 1) If you're happy to discuss your photos, say so in a reply to this thread, and I'll maintain a list of participants at the top. 2) If you're interested in how a photo was achieved, and the photographer is listed as a participant in the list, link to their photo in a reply here. Please don't ask for details unless the photographer is a participant - that way we avoid awkward "I'd rather not" replies. I suppose there's nothing stopping one PMing a photographer to see if they'd be interesting in participating, too.
|
http://www.longexposure.net |
|
AnAppleSnail

Location: Charlotte, NC
Gender: Male
Total Likes: 49 likes
ALL the flashlights!
| | |  | | | Re: The Photo Dissection Thread
< Reply # 2 on 3/8/2009 4:22 AM >
| Reply with Quote
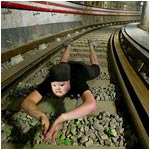
| | | EDIT: Looks like I didn't read the original post very well. I guess I'll leave this here, and if you see any pictures I've taken that you want to ask me about, I'll be glad to tell you what I've stumbled upon...  http://www.flickr....45@N04/3329642111/ http://www.flickr....45@N04/3329642111/The lighting here is a bit messy. Large (3w D cell) mag light bouncing off the wall to my right. Bike headlamp sideways about 3' inside the 6' RCP to give glow. All lights kept on steady, green laser point stroked across falling water. 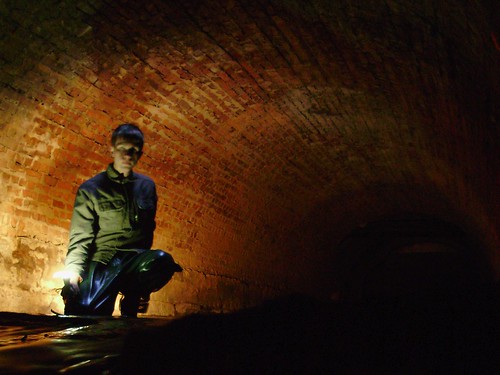 http://www.flickr....45@N04/3327442802/ http://www.flickr....45@N04/3327442802/I'm lit by a grate above, and a ping-pong-balled light in my hand. The tunnel is lit with a 6v megalight in my other hand, held where the camera can't see it. The megalight was kept on for 2 seconds. 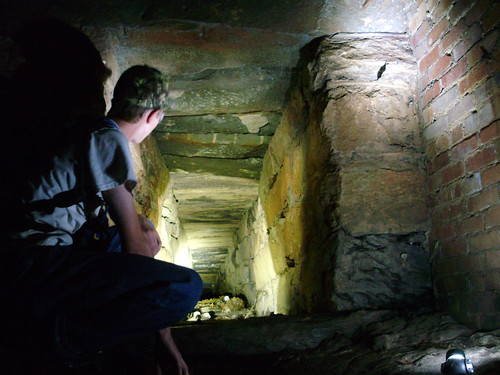 http://www.flickr....45@N04/3200573428/ http://www.flickr....45@N04/3200573428/2 small LED spots for near light (On top-right door, and on me), headlamp for near tunnel, and my late Cree supertorch for the deep tunnel. All LED lighting, and cold as the damn arctic. Compare to http://www.flickr....45@N04/3199727895/, lit only with the Cree. Meta, do we talk about frantically waving LED lights to get even coverage?
[last edit 3/8/2009 4:31 AM by AnAppleSnail - edited 1 times]
|
Achievement Unlocked
|
|
metawaffle
King of Puns
Location: Brisbane!
Gender: Male
Total Likes: 19 likes
Purveyor of Fine Lampshades
| | | | Re: The Photo Dissection Thread
< Reply # 5 on 3/8/2009 10:22 AM >
| Reply with Quote
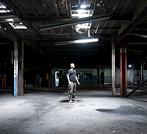
| | | Serious and Important Exploration I'm going to give some detail on this image, just because I need an excuse to post the silliness, and it's a very simple setup. The location is the remnant of a world war two US Army mess hall, something of a novelty in this area, and one slated for demolition in the near future (a portion of the camp is retained for posterity, but not this bit). So, I'd been here recently, and had had my fill of 'serious' shots. I was back with a friend who hadn't seen the place before, and so decided to take a prop, and go for novelty.  Rock on! Rock on! Obviously, this shot is lit with flash, to freeze motion. I don't often take short, flash-lit exposures at night, so this is a departure for me. A single flash was positioned underneath my leaping form, pointing straight up, with a Sto-Fen tungsten-balanced diffuser, to soften the light, and spread it around the building. I didn't think it would be so effective at lighting up my surrounds, even at the overexposed power level I chose. I did prop up a piece of wood with rusty nails in it, in front of the flash, to avoid any lens flare issues. Always a good idea, putting down some rusty nails right where you're jumping around. I didn't have radio flash triggers on-hand, so I used Nikon's built-in remote triggering instead. This meant using the on-camera flash as a master trigger, but I set it manually to minimum power, and covered it with a blue gel, and it has no appreciable effect on the image. So, that's it - one diffused light source, and a room that bounced the light around pretty readily.
|
http://www.longexposure.net |
|
AnAppleSnail
Location: Charlotte, NC
Gender: Male
Total Likes: 49 likes
ALL the flashlights!
| | | | | Re: The Photo Dissection Thread
< Reply # 6 on 3/8/2009 3:42 PM >
| Reply with Quote
| | | Posted by rob666
My initial thought on the setups that you describe below is "no wonder I don't get these effects. I don't use 3 or more light sources!"
I really like how the ligting brings out the texture of the bricks. I assume the megalight is shone behind you, down at the ground? I picked up on using a ping pong ball (thanks meta) but haven't tried it yet. Nice effect.
The small spots really do it for me. So much more detail than if a bigger spot had been used. Sorry to hear about your Cree though. 
|
The small spots are mostly to get a more even light, they're not very bright. You can set them on the ground pretty close to something that's not lit by your megalite and it will show detail without washing out. The real trick with lights is to get texture! This is mostly getting the colors and natural shadows to show up (That's right, artificial lights meticulously placed for 'natural' shadows). This is what you get when you do it wrong (Light from two directions). Bricks are flat, shadows are funny.  Here is the absolute reason why to use off-camera light, for all those who don't believe us. Two identical shots, one lit with off-camera megalight, one lit with flash. Identical tripod placement, with the megalight held above head height against the right side of the brick arch. 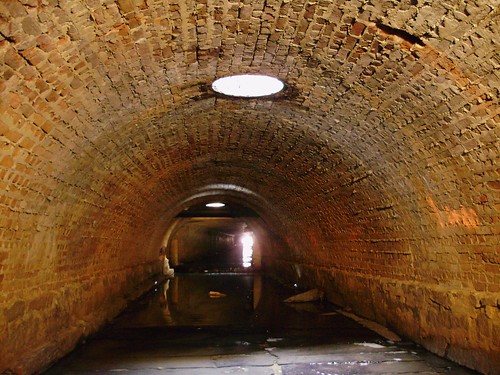 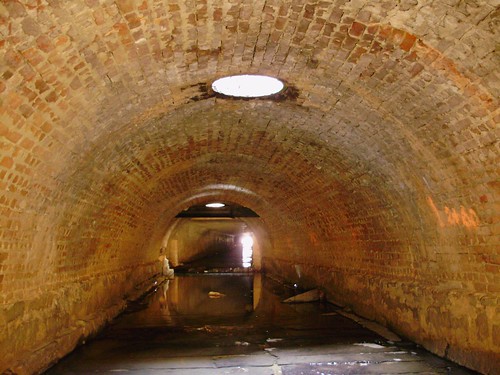 These also show poor use of the little lights. Way at the back, random sections of brick are lit with cold white light. If the sun weren't maiming the center of the picture, your eyes would be drawn to these mysterious lights trying to figure out what's so special there. It's easy to use too much light for small spaces. Anyone who spends time in 4' RCP knows this scene: 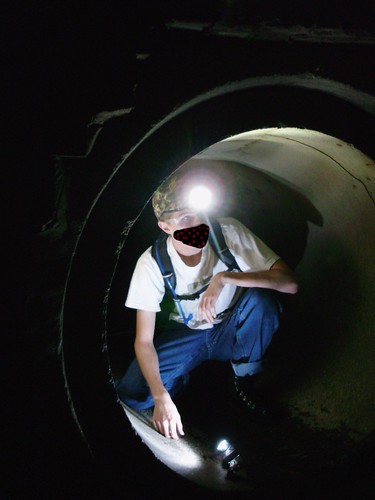 Just my headlamp and a single spot. My headlamp lights the RCP on the right, and gets my shoulder/elbow lit. The spot in front just hits bright RCP for the frontlighting. This 'lights on opposite sides' works because it's diffuse light with no shadows conflicting. That earlier picture had multisource shadows crossing, which looks funny. The pipe here winds up acting like a partial lightbox, and 2 small lights are plenty for it.  Something completely different: Candles. You have to be pretty careful not to destroy all shadows between the candles, which usually means "put tea lights along the baseboard." Here I used some brick steps (the drains on campus are old and don't have regular steprungs) to hold the candles. Any suggestions here? I haven't had a candle session in several weeks now 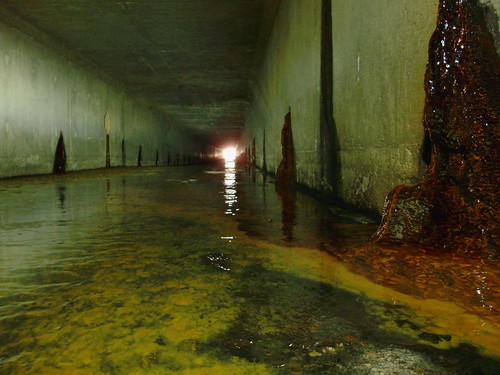 Everyone's favorite lighting method: Wave a hand light around frantically, hoping for even lighting. I think this took about eight tries, and I've used this technique many a time before. I swung fast past the near walls, and lingered far away...fairly basic, and it's easy to kill off any innocent shadows by accident. These have been most of my favorite artificially-lit pictures. If you'd like, page through http://www.flickr....otos/12536945@N04/ and feel free to ask about any you like. If I keep up shooting and lighting this way I'll completely forget how to shoot with the sun.
|
Achievement Unlocked
|
|
Jondoe_264

Location: Under . . .
Gender: Male
Total Likes: 20 likes
Yes! Sewers!
| | | | Re: The Photo Dissection Thread
< Reply # 18 on 5/21/2009 11:29 AM >
| Reply with Quote
| | | Posted by micro
Oh yeah. Right. Ok.. so I gave it a few (five?) seconds worth of foreground lighting with the trusty spot, making sure not to light too far into the steel section where I knew I'd be standing. Then I dashed forward and lit the rest of the pipe up for another five. And *then* (this is something I've been doing a fair amount lately), I stuck out my arm and turned the spotlight back on me which can result in some nice lighting patterns and highlights around me.
Another thing I've started to do a lot over the past few months has been to do all my test shots at ISO 3200. That way I'm not wasting precious battery power and time trying to figure out what might get the best results. Quick and dirty flash-filled shots help a lot too, especially when trying to get angles right because working through the viewfinder isn't always convenient.
|
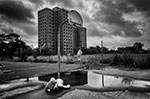
Awesome, thanks. I too have been doing similarly with the light shone back on myself, often results in some nice stuff. This is a recent example of it in practice from me . .  In the interest of Teh Thread. That pic is three shots photochopped. One exposure for the foreground, one for a good exposure of the side pipes brickwork (i.e. not blown out), then one with me jumping in the shot, leaving the side pipe lighting in place and using a torch first shining the torch ahead to illuminate some of the distant tunnel, then shining it back on myself to try to achieve a crisper silhouette-ish. I like most of it except the foreground, especially far right, I think it looks a little unnatural, almost HDR like . . shudder.
[last edit 5/21/2009 11:33 AM by Jondoe_264 - edited 1 times]
|
". . . for this purpose the plans of Mr.Bazalgette are most effective."
|
|
Jondoe_264
Location: Under . . .
Gender: Male
Total Likes: 20 likes
Yes! Sewers!
| | | | Re: The Photo Dissection Thread
< Reply # 19 on 5/21/2009 11:32 AM >
| Reply with Quote
| | | Posted by metawaffle
Serious and Important Exploration
I'm going to give some detail on this image, just because I need an excuse to post the silliness, and it's a very simple setup. The location is the remnant of a world war two US Army mess hall, something of a novelty in this area, and one slated for demolition in the near future (a portion of the camp is retained for posterity, but not this bit).
So, I'd been here recently, and had had my fill of 'serious' shots. I was back with a friend who hadn't seen the place before, and so decided to take a prop, and go for novelty.
Rock on!
Obviously, this shot is lit with flash, to freeze motion. I don't often take short, flash-lit exposures at night, so this is a departure for me. A single flash was positioned underneath my leaping form, pointing straight up, with a Sto-Fen tungsten-balanced diffuser, to soften the light, and spread it around the building. I didn't think it would be so effective at lighting up my surrounds, even at the overexposed power level I chose. I did prop up a piece of wood with rusty nails in it, in front of the flash, to avoid any lens flare issues. Always a good idea, putting down some rusty nails right where you're jumping around.
I didn't have radio flash triggers on-hand, so I used Nikon's built-in remote triggering instead. This meant using the on-camera flash as a master trigger, but I set it manually to minimum power, and covered it with a blue gel, and it has no appreciable effect on the image.
So, that's it - one diffused light source, and a room that bounced the light around pretty readily.
|
Well that worked a treat then! I have yet to really dip my toe in to the use of flash(es), but I see a whole world of other possibilities there. I know Steve Duncan often shots with remote flashes etc, and gets some special results.
|
". . . for this purpose the plans of Mr.Bazalgette are most effective."
|
|
|
| This thread is in a public category, and can't be made private. |
|
All content and images copyright © 2002-2024 UER.CA and respective creators. Graphical Design by Crossfire.
To contact webmaster, or click to email with problems or other questions about this site:
UER CONTACT
View Terms of Service |
View Privacy Policy |
Server colocation provided by Beanfield
This page was generated for you in 171 milliseconds. Since June 23, 2002, a total of 739807733 pages have been generated.
|
|