|
MacGyver
 
location:
St Paul, Minnesota
Gender: Male
"Someone go find me a paperclip, a D-cell battery, and a cheese grater"
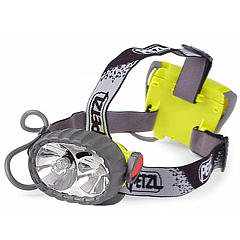
 | |  | Brinkmann LED headlamp review and modification tutorial
< on 9/16/2003 6:23 PM >
|  | | | I got an LED headlamp from my aunt for christmas, and I was like "Hey, thanks. This will be great for... uh... camping. yeah."
It turned out to work even better than I thought it would. It runs one white LED on two AA batteries. I haven't timed how long batteries last, but I know it's far longer than if they were powering a tungsten bulb. The unit is not too bulky. Here's a comparison with a 4D cell maglite and a 2AA cell mag:
The unit us comfortable to wear on my head and all the straps are adjustable. The battery pack and head unit have foam pads where they sit against the head. The power switch is a click on/click off rubber-covered button on the top of the head unit. The battery compartment's construction could be beefier, but I haven't had any problems yet (and there's a lot of hacks and dings on that thing). A rubber bad wrapped around it would keep it from popping open and losing your batteries if it got banged on the ceiling or something.
The light output is comparable to that of a 2AA maglite, except it is a sharp bluish-white instead of a soft orange color:
(These are each 1 second at F3.2, ISO 100 in my somewhat dark dorm room)
The lamp came with a lens built into the normally flat reflector shield. It made the beam have a bright spot in the middle, about the size of a coffee can when projected at the ground from head level. Around the bright spot was an almost completely unlit donut shape, surrounded in turn by a dimly-lit faded out donut. I didn't like the bright spot. I need more of a fill light than a sharp spot. I devised a plan to remove the lens.
I was worried about how bright the light would be after removing the lens, but I soon found myself using the headlamp in tunnels and drains with the rubber and acrylic cover removed, exposing the reflector and LED beneath. This is the same effect I would get by cutting the lens out, so I went ahead with it.
Initially, I was going to try to sand or grind off the hump in the middle of the window that was the lens, but getting it completely smooth and flat would be nearly impossible. I opted to do it the manly way and hack the whole thing off. The rubber and acrylic shield twists off of the head unit with little effort. The clear acrylic window/cover part comes out of it's black rubber housing by prying the rubber back over some barbs. I used a forstner bit to machine away the flat part of the acrylic piece. Once I had removed about 1/8", I sanded the burrs off of everything and cut a circle out of a scrap of 1/8" acrylic sheet left over from putting a window in my computer.
I ended up making the new window a bit small, but it is large enough to catch on the remaining part of the old acrylic tube and work perfectly. Now just drop the new window in to the rubber part and refit the rest of the old acrylic tube in over the top of it to hold it in place. Viola; a new unfocused light.
Not a shabby light for about US$20. Here's a link to it at REI.com:
http://www.rei.com/online/store/ProductDisplay?storeId=8000&catalogId=40000008000&productId=47576078& parent_category_rn=4500596
Like a fiend with his dope / a drunkard his wine / a man will have lust for the lure of the mine
"If you are not part of the solution, you are not dissolved in the solvent." |
|
Greysand

Noble Donor
location:
USA - California
Gender: Male
| |  | Re: Brinkmann LED headlamp review and modification tutorial
<Reply # 1 on 9/16/2003 6:54 PM >
|  | | | Pretty cool.. With the weight on that unit being as low as it is you may be able to get away with taking the center 'over the head' band off as well.. give it a try and see how it wears..
I'd love to be able to do that with my DUO.. But the things a beast, and wobbles if I take off the center band. thou, of course I'd also love to do this: http://www.foresight-designs.com/web_data/home.html with my DUO.
But alas, the price you pay for being poor.. Not being able to have 48-LED array's strapped to you head.. Would make a grand 'stun & awe' item thou..
I don't mind Drain fog... I like to see what I breathe. |
|
MacGyver
location:
St Paul, Minnesota
Gender: Male
"Someone go find me a paperclip, a D-cell battery, and a cheese grater"
| | Re: Brinkmann LED headlamp review and modification tutorial
<Reply # 2 on 9/16/2003 6:56 PM >
| | | | the center strap doesn't really bother me. The whole thing is light enough that it just sits there like a loose hat. If you took off the middle strap, you'd have to make the other straps quite a bit tighter to keep it from wiggling around or sliding down onto yur face. I sort of hang all the weight from that middle strap and use the outer ones for balancing it. Comfy that way.
Like a fiend with his dope / a drunkard his wine / a man will have lust for the lure of the mine
"If you are not part of the solution, you are not dissolved in the solvent." |
|
Caput_58
 
location:
Virginia, USA
Gender: Male

| |  | Re: Brinkmann LED headlamp review and modification tutorial
<Reply # 3 on 9/17/2003 2:37 AM >
| | | | I have a couple tungsten equipped duo's (well, only one works. caving kills lights), but I find I prefer to take my miniature double LED headlamp. It gives great hands free wide angle light to keep me from tripping/falling down holes. I back it up with my 4-D cell flashlight/camera anti-theft device for when I need real light.
The defocussing is a darn good idea for that sort of application.
Caput_58
|
|
Hitman X
location:
Cambridge, ON
Gender: Male

Robot Parade!
| |  | Re: Brinkmann LED headlamp review and modification tutorial
<Reply # 4 on 9/29/2003 6:58 PM >
| | | | Would it really be tha hard to make large array of LED's?
Like 10-20?
I’m not krazy, I just need to get off this island. The doctors don’t believe I invented the chocolate éclair. But I did. I’m going to burn them all and drink soup from their skulls! Happy soup! Untie me and I’ll kill you last! |
|
MacGyver
location:
St Paul, Minnesota
Gender: Male
"Someone go find me a paperclip, a D-cell battery, and a cheese grater"
| | Re: Brinkmann LED headlamp review and modification tutorial
<Reply # 5 on 9/29/2003 10:37 PM >
| | | | The electronics are very doable, but fitting it into a case would prove troublesome. You'd have to get lucky enough to have a headlamp that you could fit the contraption into or be good at making one. I would rather have a water resistant and sand proof headlamp enclosure than a bunch of LEDs on a rough cut PC board duct taped to a hat.
Several types of these lights do exist. Here's a kit that installs within a Petzl Duo headlamp.
the normal headlamp (a tungsten and a halogen lamp)
with one led module

with two LED modules

[last edit 9/29/2003 5:37 PM by MacGyver - edited 1 times]
Like a fiend with his dope / a drunkard his wine / a man will have lust for the lure of the mine
"If you are not part of the solution, you are not dissolved in the solvent." |
|
Powered by AvBoard AvBoard version 1.5 alpha
Page Generated In: 62 ms
|
|