
|
|
I feel like this picture is either too blue or too yellow, something is definitely missing in my opinion. Setting an automatic color balance doesn't seem to improve much. Any ideas?
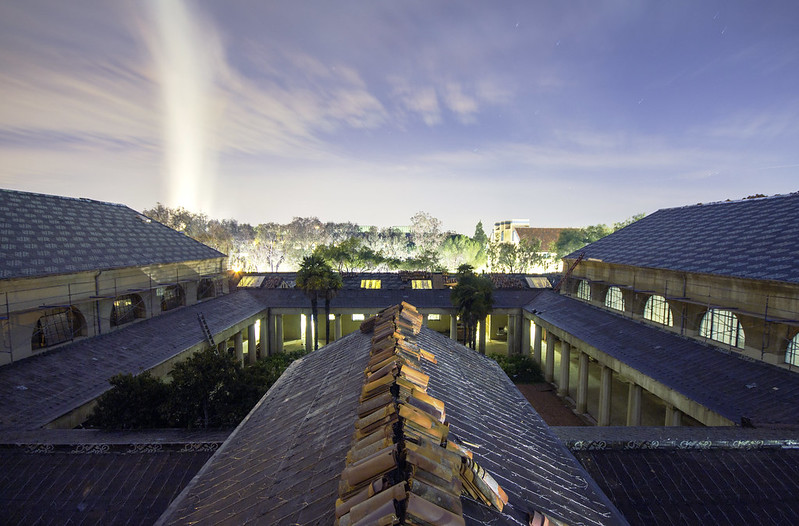
Leland's Gym by location.href, on Flickr
EDIT: This picture was made from 4 Canon RAW files of different exposures with the photoshop HDR mode. Now I realize that the colors look way more natural with JPEG inputs (never mind the contrast, I didn't repeat the exact same steps):

In general, I feel like using RAW files shifts the orange tones to yellow-ish, at least when using Photoshop HDR. I'm pretty new with RAW processing, is this an expected behavior? What can be done in general to fix this?
[last edit 12/3/2014 9:15 AM by romainpp - edited 1 times]

| |
I always prefer sorting this out on your camera first. When ALL my photo's tend to be on the yellow-ish side I permanently use the in-camera white balance shift to move it more to the blue/magenta side.
At home you can fiddle around with the white balance in your raw processing software, or if that doesn't work out, the camera calibration.
To me the upper photo doesn't look too bad, it's a pretty natural looking white balance just a bit to the cool side. I guess you had it set to 'light bulb' or 'custom' or anything alike? 'Auto' or 'daylight' will give you warmer tones. PS HDR does increase the blues in the shadows too.
By the way, they are still overexposed which kind of defeats the purpose of HDR. I'd lose the HDR all together but that's just a matter of taste.
www.basdemos.com | |
Try this: create a new Photoshop layer over this image. Fill it with a dark reddish/brownish color. Set Layer blending to "overlay" and set the layer opacity somewhere around 10-15 percent. That should warm things up a bit.
| |
Fixed your color issue 

| |
Thanks for the comments guys!
Posted by sirpsychosexy
By the way, they are still overexposed which kind of defeats the purpose of HDR. I'd lose the HDR all together but that's just a matter of taste.
|
You're right, I also tried to keep just the most exposed picture and it gives reasonable results.
Posted by turtl
Fixed your color issue :p
|
Haha thanks! That's what I've been doing in some cases for this exact same reason.
| |
Posted by fiftyone_eggs
Try this: create a new Photoshop layer over this image. Fill it with a dark reddish/brownish color. Set Layer blending to "overlay" and set the layer opacity somewhere around 10-15 percent. That should warm things up a bit.
|
THIS. +1
After you've merged to HDR, warm it up in PS with a new layer. I wouldn't try fixing colors in Camera Raw, then going back to merge to HDR. But, that's me. I would merge first, then add a second layer with a warming color/filter. Whichever you know what to do better. I prefer layers, personally.
Flickr: https://www.flickr...9156858@N05/albums | |
Romain:
I suffer this problem quite frequently and tackle it several different ways.
1.
In Lightroom, I use the color temperature paint brush / local adjustment, and very tediously paint in sections that I want cooler or warmer. I always set the Flow and Density to 100% so I don't get overlapping brush strokes. Then cool off or warm up the section. Depending on the effectiveness of "Auto Mask" I turn it on and off as needed while painting over different sections, edges, etc.
2.
Use LR gradients with color temperature.
3. Split toning also can help. Cool off shadows and warm up highlights is my usual trick. Sometimes I do this on top of steps 1 & 2.
4.
Selective color desaturation, such as greens to deal with those streetlights.
5. Google Nik ColorEfex Pro 4, Remove Colorcast module helps, as well as Neutralize Whites, or "Correct Colorcast" slider under Pro Contrast.
Many times I combine all 5 of these in one process. Color temperature is the number one thing I work on in my photos. Cooling skies, while keeping the rest of the image warmer...
I actually like the first process being so blue. Maybe desaturate purple a little and throw a warm gradient on the lower half of the photo? This photo lends itself perfectly for this approach since it is easily split horizontally.
-free
[last edit 12/11/2014 5:05 AM by freeside - edited 1 times]
| |
Posted by freeside
Romain:
I suffer this problem quite frequently and tackle it several different ways.
1.
In Lightroom, I use the color temperature paint brush / local adjustment, and very tediously paint in sections that I want cooler or warmer. I always set the Flow and Density to 100% so I don't get overlapping brush strokes. Then cool off or warm up the section. Depending on the effectiveness of "Auto Mask" I turn it on and off as needed while painting over different sections, edges, etc.
2.
Use LR gradients with color temperature.
3. Split toning also can help. Cool off shadows and warm up highlights is my usual trick. Sometimes I do this on top of steps 1 & 2.
4.
Selective color desaturation, such as greens to deal with those streetlights.
5. Google Nik ColorEfex Pro 4, Remove Colorcast module helps, as well as Neutralize Whites, or "Correct Colorcast" slider under Pro Contrast.
Many times I combine all 5 of these in one process. Color temperature is the number one thing I work on in my photos. Cooling skies, while keeping the rest of the image warmer...
I actually like the first process being so blue. Maybe desaturate purple a little and throw a warm gradient on the lower half of the photo? This photo lends itself perfectly for this approach since it is easily split horizontally.
-free
|
Awesome freeside, thanks for the review and advice!
|
Add a poll to this thread
This thread is one of your Favourites. Click to make normal.Click to make this thread a Favourite.

| This thread is in a public category, and can't be made private. |
Powered by AvBoard AvBoard version 1.5 alpha
Page Generated In: 93 ms
|
|


