See the "UER LDB FAQ" thread
http://www.uer.ca/...urrpage=1&pp#post0 for the most current version of this post.
==
I love to read forum posts about explores; they’re hugely entertaining and informative. But it’s like reading an adventure magazine; the posts almost never seem to be about places where I can or want to go.
The UE database is the better vehicle for finding sites and learning about them. It’s organized (more so than forum posts anyhow). And its contents don’t get archived; so people can search everything that’s out there. This is where you can do the UE community the most service, if you’re so inclined.
Much has been said here about what locations to post in the database, why, and whether to post them at all; but not a lot of how. I love to write documentation. So here’s how I do it. I’ll just touch on a few important policies here; see other posts for complete policy information. Please correct or improve these instructions. Thank you!
First of all, you have to be a full member to create a database location. If you overlooked the instructions for becoming a full member, please see the Rookie Forum, or follow this link,
http://www.uer.ca/...urrpage=1&pp#post0 Second of all, if you’re thinking about both posting in a forum about your explore and creating a database location about it, create the database location first. This way, you can write your forum post from inside the database, and it will be retrievable from there. If you do the forum post first, then the database location as an afterthought, you can’t retroactively link the post to the location. (Hello, developers!) It’s too soon to actually tell you how to write a post from a location; stick with me, we’ll get there.
In the left sidebar, click UE DB. (DB Map and My DB do nothing, as far as I can tell.)
Navigate down the hierarchical lists to your location's country and state/province (could be different from where you live). Read “Available Locations” for towns which are close to your location. If your location is in the database already, stop. Creating another location that’s identical to an existing one would lead to confusion; instead, contribute to the existing location you’ve found.
If your location doesn’t already exist, scroll down to the Tasks section. Click CREATE A NEW LOCATION.
1.

Read “Location Database Policies.” To proceed, enter a name for your location. If the location is sensitive and its real name seems like too much information, give it a generic name. Click CREATE NOW. At this point, your location gets created; but only you can see it.
2.

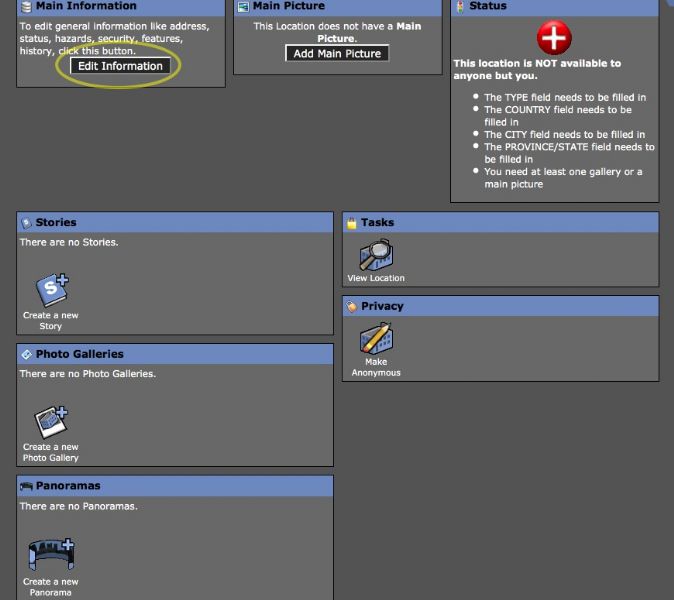
Now you get a page with a series of areas I’ll call “Overview” from which you can go to more detailed pages and do stuff; the top left area is labelled “Main Information.” Notice the top right area, “Status;” it shows who can see the location, and lists tasks required to make the location visible to others. There are three levels of access;
1. You only. Every new location defaults to this level.
2. Full members of UER only
3. All registered members of UER, including basic members (only to be used for locations that are public or demolished)
To qualify your location to be viewable by others, you must create at least the “Main information” and “Main picture” sections.
Enter (or update) your main information now, by clicking EDIT INFORMATION.
3.
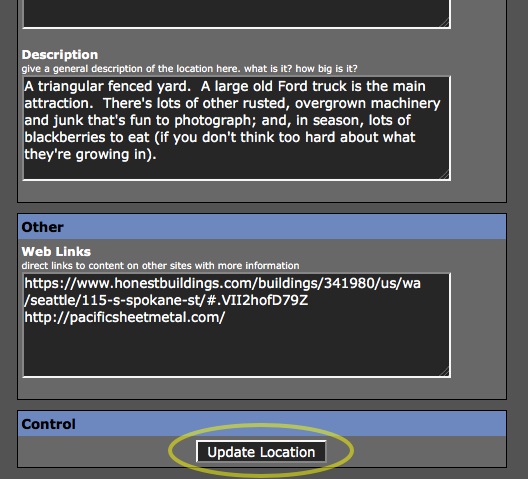
The field names and descriptions make what to enter pretty obvious; I suggest looking at all of them before you start typing in stuff, to avoid cramming information into one field that should really be in another. Some, like “History,” may need a little research; but there doesn’t seem to be a limit for how long you can have the location open, so I don’t think you need to have all your research, web links, etc. lined up before you charge ahead. (But that level of preparation would probably improve the quality of the location.)
Generally, fields aren’t required. My understanding of current geolocation policies:
* You may choose to omit the address if you want to vet new explorers or at least slow them down.
* You need to at least enter the real name of the city/town the site is in or near. If the site is too sensitive for that information to be published, don’t create a location for it.
* The same advice applies to the coordinates map that follows. Set “Co-ordinate accuracy” accordingly.
When you’re done typing (and after any update you make later on), scroll to the bottom of the page and click UPDATE LOCATION. Now you’re back at the overview.
4.
Check “Status” again; the list of tasks to make the location viewable to others should now be shorter.
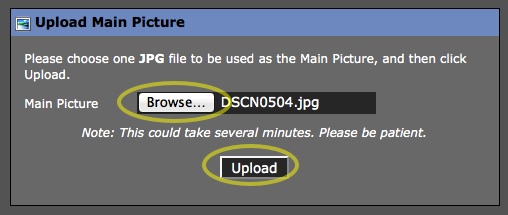
The next thing to do is to create a main picture. OSX users, your picture needs to be a file; you can’t upload to UER from iPhoto. Click MAIN PICTURE.
You see the Main Picture page. Click BROWSE to navigate to your picture file on your computer. When you’ve got it, click UPLOAD.
5.
UER shows you messages about the progress of the upload. When it’s done, click RETURN TO LOCATION EDIT. Now you’re back at the overview.
6.

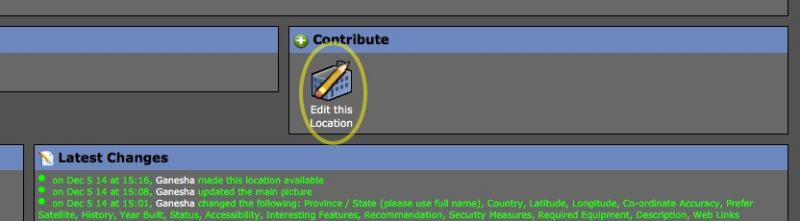
To update your location later (or to update any other location), view it. In the overview, find the “Tasks” area on the right side and click VIEW LOCATION. Or just click UE DB in the left sidebar and navigate to the location. On the right side near the bottom of the view page, find the “Contribute” area. Click EDIT THIS LOCATION.
(Update) One reason why you might update your location is if a moderator has contacted you and asked you to provide more information. For example, Mike Dijital told me that my Pacific Sheet Metal location was only granted provisional 3-month availability because the moderators like to see at least one photo gallery for the location. (I'll post a separate tutorial about photo galleries to this thread.)
7.
Check “Status” again. You should see “This location is ready to be made available.” You can do this now, or create or update more sections of your location. You can also create or update more sections after you’ve made your location available.
When you click MAKE AVAILABLE in “Status” your location advances to Level 2 access; all full members can see and update it. Yes that’s part of the sharing; you don’t own the location you created, altho your screen name will always remain as its creator. Also, only you can change the main picture.
8.

Now the button in “Status” changes to MAKE FULLY PUBLIC. If you click it, the location advances to Level 3 Access; any registered UER member, including basic members, can see it. This level is for locations that are public or demolished.
9.

To create a new forum thread about this database location that’s linked to the location, view the location. Scroll to the bottom of the view page. In area “Forum threads about this location” click NEW THREAD.
10.

Please correct or improve these instructions. Thank you!