DIY Panning Timelapse Device Build Tutorial + Test Video < on 12/9/2012 1:02 AM >
This is a video I made using my homemade panning time-lapse device from a mechanical water timer. I got the idea from something I stumbled upon online, but can't for the life of me find the article or video. Credit goes out to whomever posted the idea on the internet
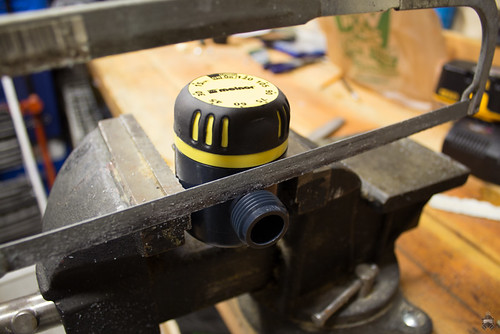
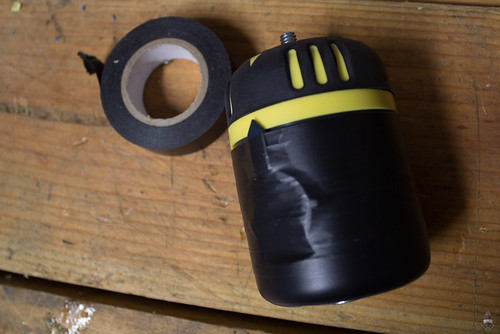
Materials: -1x Melnor 3010 Mechanical Water Timer -1x 1/4"-20 x 12.5mm Insert Nut -1x 1/4"-20 x 3/4" Machine Screw (or Bolt) -1x 1/4"-20 Nut -2x Washers -Epoxy -Electrical Tape
Tools: -Drill -Drill Bits (I don't recall the exact sizes used, but it's really not difficult to figure it out by eye) -Small Flathead Screwdriver -Phillips Screwdriver -Pliers -Hacksaw -File -X-Acto Knife -Rubber Mallet -Vise
Instructions:
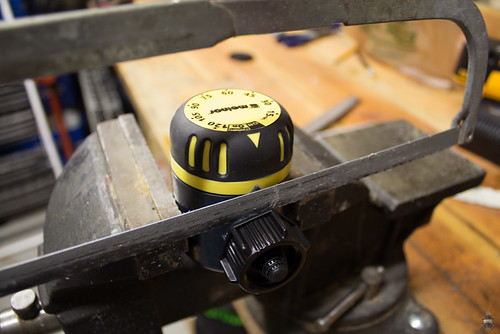
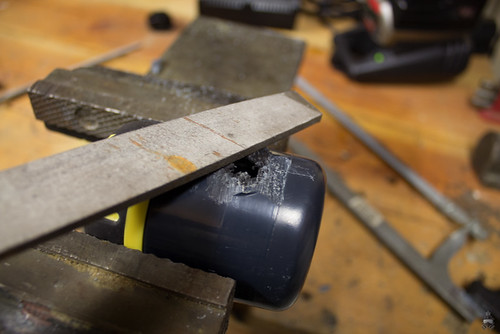
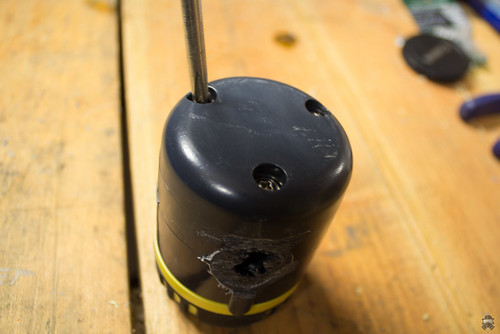
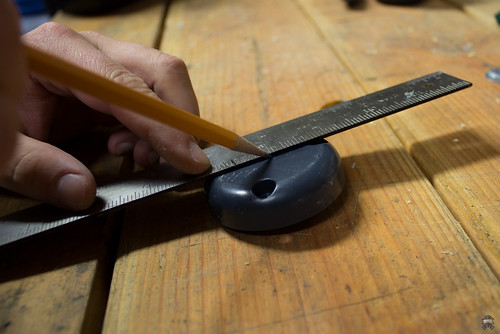
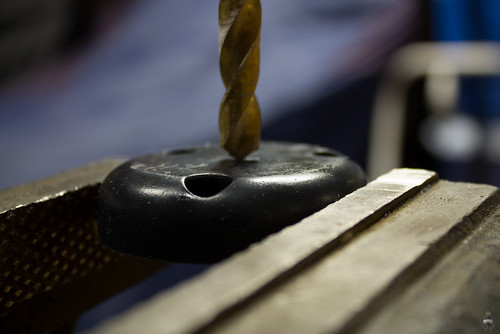
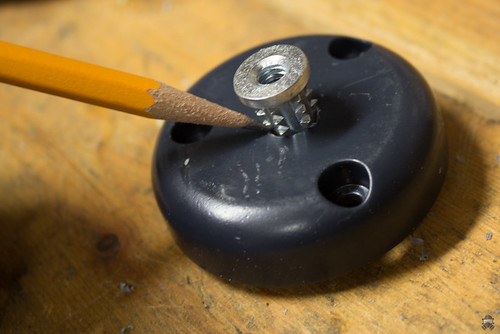
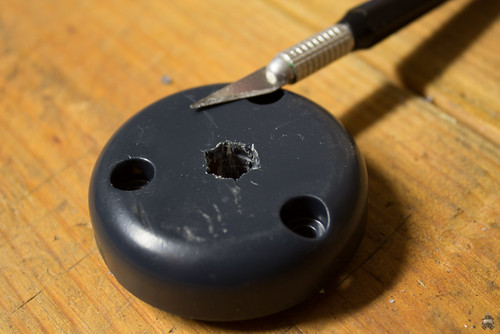
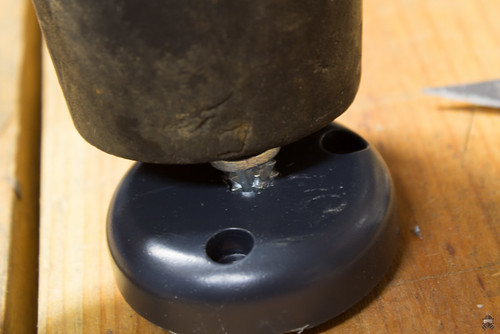
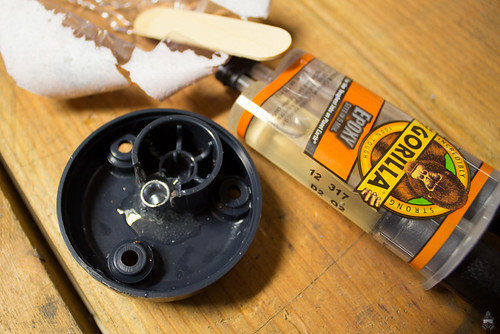
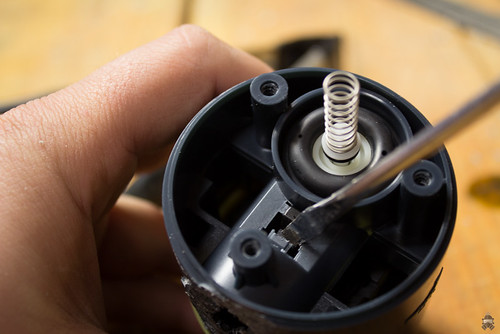
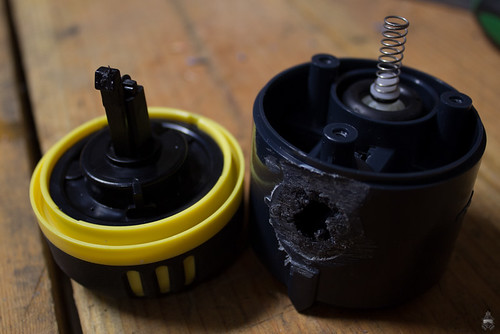
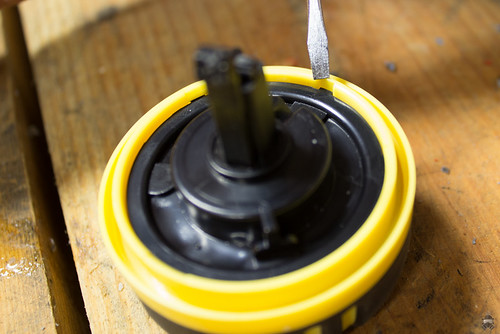
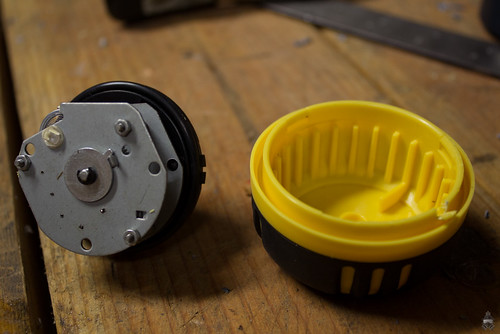
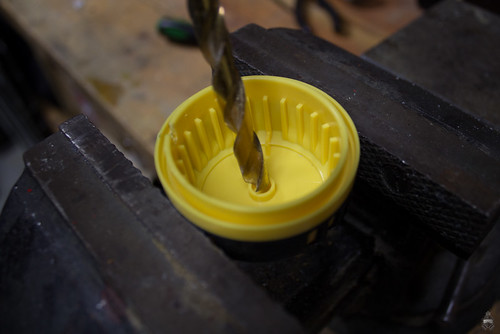
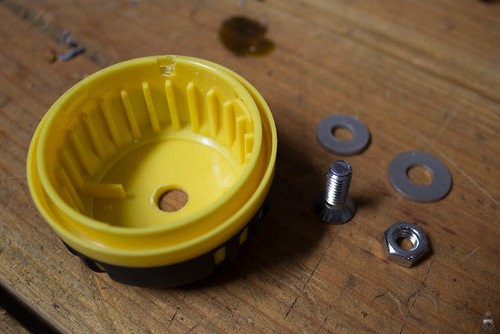
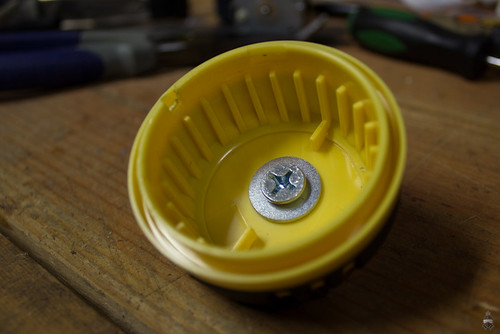
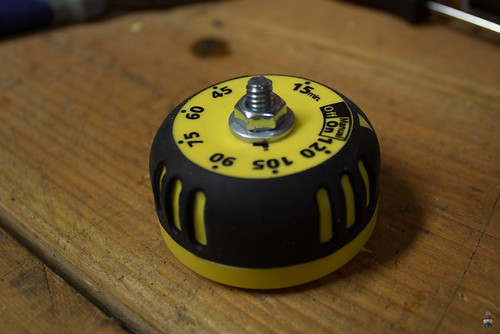
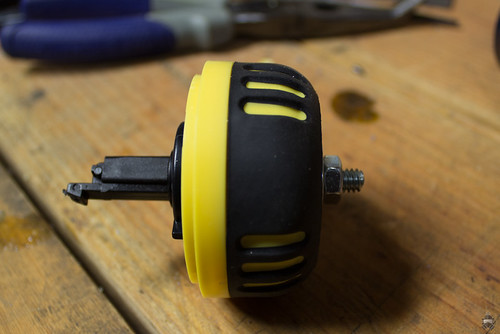
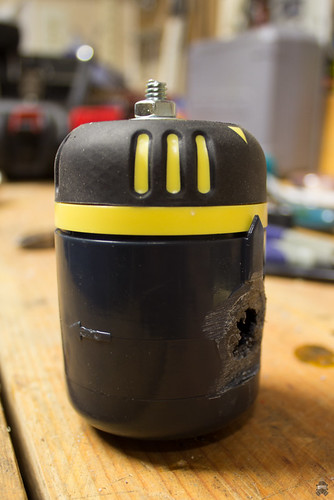
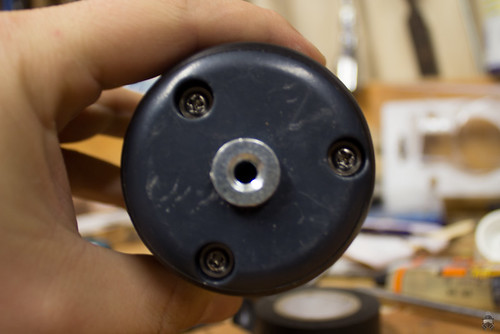
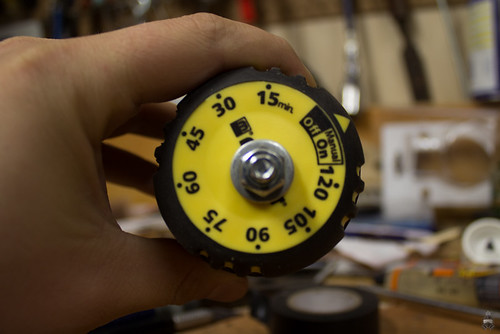
Step 1 Unpack the water timer and secure it in a vise. Using the hacksaw, saw off the hose connections on either side. Step 2 File down the remnants of the hose connections to make it flush. Step 3 Using the phillips screwdriver, unscrew the bottom cap of the water timer. Be not to lose the spring while removing it. Step 4 Find and mark the center of the bottom cap. Secure it in a vise, and drill a hole all the way through. Step 5 Put an insert nut into the hole drilled in step 4, and using a pencil mark the location of the insert nut's "teeth". Step 6 Using an x-acto knife, cut small notches for the insert nut's teeth marked in step 5. Step 7 Place the insert nut back in the hole, aligning the teeth with the notches cut in step 6. Hammer it into place with a rubber mallet. Step 8 The teeth should pretty much keep it in place, but just in case mix up some epoxy and spread it around the insert nut on the inside of the bottom cap. Set it aside to dry. Step 9 Looking into the center of the exposed body of the water timer, you will see a piece of black plastic that stands out from the surrounding dark-purple-ish plastic. This is the clip that holds the top cap and actual timer section to the body / valve section. Use a flathead screw driver to release the clip, and pull apart the two sections. Step 10 Using a small flathead screwdriver, pry apart the black timer section from the yellow top cap. This will not be easy, and you will probably end up breaking a few of the black nubs holding the metal timer and black plastic parts together. Don't worry if you do, you don't need them. In addition, try not to morph any part of the yellow (like I did), as that will prevent it from spinning properly. If you do morph it, it's not a big deal - just use wire cutters to clip off the affected area. Step 11 Secure the yellow cap in a vise, and drill a hole perfectly in the center. Step 12 Place a washer onto the machine screw (or bolt) and insert it at the bottom of the yellow cap, through the hole you drilled in step 11. Place another washer on top and secure the whole thing with the nut. Step 13 Put the timer device and black plastic piece back inside the yellow cap. Make sure it's completely snapped into place. Step 14 Screw the bottom cap back onto the body, and place the top section back in - making sure the clip snaps back into place. Step 15 For aesthetic reasons, wrap the body of the timer with black electrical tape. Step 16 Screw on your camera, attach to tripod and enjoy! Abandoned not Forgotten (Under Construction) Flickr | YouTube | Facebook Canon T4i | Tokina 11-16mm f/2.8 | Canon 50mm f/1.8 II | Manfrotto 190XPROB
Re: DIY Panning Timelapse Device Build Tutorial + Test Video <Reply # 2 on 12/9/2012 5:15 AM >
Cool idea and nice results!
Speaking as a vegetable farmer, I now know what to do with broken irrigation timers other than accumulate them for parts! http://www.flickr.com/photos/heinrick05/
Re: DIY Panning Timelapse Device Build Tutorial + Test Video <Reply # 4 on 12/10/2012 1:25 AM >
Posted by CatAndTie You know, I've been trying for a while now to get a good panning tool for timelapse but haven't found one that has been satisfactory yet.
Maybe I'll have to give this one a go!
What have you tried? This does the trick really well. The only thing is you can't change the speed.
Posted by heinrick Cool idea and nice results!
Speaking as a vegetable farmer, I now know what to do with broken irrigation timers other than accumulate them for parts!
Thank you! There you go - very green of you
Posted by MonkeyPunchBaby Wonderful! I am going to make this next week. You should seriously think about making several and selling them.
Do it, post up the results when you're finished! I thought about it, but unfortunately I'm always busy and don't have enough free time! Abandoned not Forgotten (Under Construction) Flickr | YouTube | Facebook Canon T4i | Tokina 11-16mm f/2.8 | Canon 50mm f/1.8 II | Manfrotto 190XPROB
Re: DIY Panning Timelapse Device Build Tutorial + Test Video <Reply # 7 on 12/13/2012 8:44 PM >
Posted by Abandoned not Forgotten
What have you tried? This does the trick really well. The only thing is you can't change the speed.
Thank you! There you go - very green of you
Do it, post up the results when you're finished! I thought about it, but unfortunately I'm always busy and don't have enough free time!
I've tried with an egg timer and one with a regular clock motor... Both are just too unstable. "Man cannot discover new oceans unless he has the courage to lose sight of the shore." - Andre Gide
That's with a kitchen timer, I saw it done with a water timer before. Although, essentially it's the same idea! Abandoned not Forgotten (Under Construction) Flickr | YouTube | Facebook Canon T4i | Tokina 11-16mm f/2.8 | Canon 50mm f/1.8 II | Manfrotto 190XPROB
Re: DIY Panning Timelapse Device Build Tutorial + Test Video <Reply # 10 on 12/29/2012 10:44 PM >
Posted by CatAndTie
I've tried with an egg timer and one with a regular clock motor... Both are just too unstable.
This thing is pretty stable, I was surprised that it was able to turn (on an angle) even with my Canon T4i + 5 pound Tokina 11-16mm on it. Abandoned not Forgotten (Under Construction) Flickr | YouTube | Facebook Canon T4i | Tokina 11-16mm f/2.8 | Canon 50mm f/1.8 II | Manfrotto 190XPROB
Re: DIY Panning Timelapse Device Build Tutorial + Test Video <Reply # 12 on 1/19/2013 2:23 AM >
THAT is a fucking awesome tutorial!
Q: How slow does it go?
I tricked out a kitchen timer (one revolution per hr) but I found it went too fast for things like tracking light etc. I've had luck with regular battery-powered clockworks by utilizing the hour hand shaft, but it would be nice to be able to speed it up (although I did learn how to reverse them).
Lately I've had the most success with the low-rpm gear motors at servocity.com. There's a bit of a learning curve with all those electronics but there's also alot more power and control.
Re: DIY Panning Timelapse Device Build Tutorial + Test Video <Reply # 13 on 1/19/2013 3:11 AM >
Posted by macgruder great idea. Very clever. Sure costs a lot less that pro panners I'm sure.
Thanks! Yup, about $15 total investment if I remember correctly.
Posted by fiftyone_eggs THAT is a fucking awesome tutorial!
Q: How slow does it go?
I tricked out a kitchen timer (one revolution per hr) but I found it went too fast for things like tracking light etc. I've had luck with regular battery-powered clockworks by utilizing the hour hand shaft, but it would be nice to be able to speed it up (although I did learn how to reverse them).
Lately I've had the most success with the low-rpm gear motors at servocity.com. There's a bit of a learning curve with all those electronics but there's also alot more power and control.
Thank you!
The particular hose timer I picked up (and the other ones I've seen) do a revolution in 2 hours. It's almost a complete revolution, but I don't think a perfect 360 degrees would be possible. I don't know nearly enough about electronics to build my own, but if you do - that's probably the best route to go in terms of customizability! Abandoned not Forgotten (Under Construction) Flickr | YouTube | Facebook Canon T4i | Tokina 11-16mm f/2.8 | Canon 50mm f/1.8 II | Manfrotto 190XPROB
Thanks for the tip! The one's I got didn't have a thread, but rather several rows of teeth all around. If you can find threaded ones - then yes, screwing them in would definitely be a much better option. Also it's important to keep in mind that wood will mold, while this plastic could just crack under enough pressure. That's exactly why I cut little niches for each row of teeth. Abandoned not Forgotten (Under Construction) Flickr | YouTube | Facebook Canon T4i | Tokina 11-16mm f/2.8 | Canon 50mm f/1.8 II | Manfrotto 190XPROB
Re: DIY Panning Timelapse Device Build Tutorial + Test Video <Reply # 16 on 1/25/2013 6:45 PM >
OK, intrigued by the 2 hour rotation of the water-timer, I went and built this.
I made two very minor mods:
1. I used a flush insert nut at the base (instead of one with an endcap). I prefer if the entire base of the timer makes flush contact with the tripod mount:
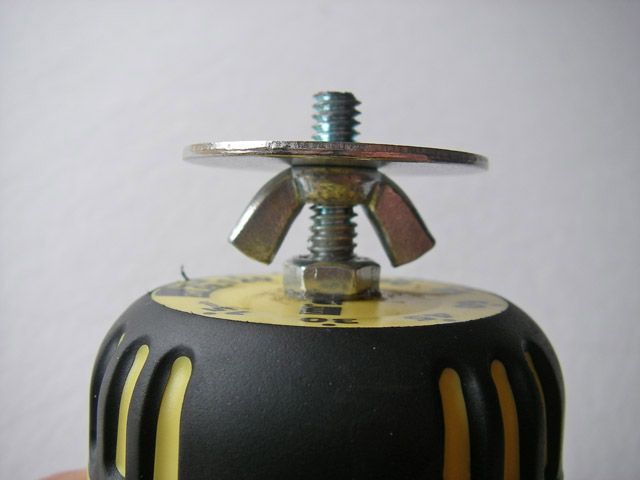
2. I used a longer bolt so that I could tighten the camera with a wingnut. This way I can point the camera wherever I want when I start. I also added a large washer for increased stability:
Findings:
So I took it for a test (just of my attic - not exciting enough to post a vid). I found that if I added my large, wide-angle lens to my Canon G9 the weight imbalance would cause the timer motor to pause here and there. It seemed to get hung up a little until it built up enough tourque to move forward. This resulted in some jerks in the final footage.
But with the big wide-angle lens removed, the motion was much more fluid and it was able to complete an entire turn without jerking.
So my lesson learned is: this works best with lightweight cameras. Judging from your photo, you hooked up a big camera and big lens to yours. Did this cause any inconsistencies in your movement?
Re: DIY Panning Timelapse Device Build Tutorial + Test Video <Reply # 17 on 1/25/2013 7:55 PM >
Posted by fiftyone_eggs OK, intrigued by the 2 hour rotation of the water-timer, I went and built this.
First of all, awesome job! I'm really happy to see someone actually attempting the build!
Posted by fiftyone_eggs 1. I used a flush insert nut at the base (instead of one with an endcap). I prefer if the entire base of the timer makes flush contact with the tripod mount: http://www.marcree...r_timer_bottom.jpg
Sweet! This is most definitely a better option than what I did! I really don't like the fact that mine isn't flush, it puts a lot more pressure on the insert nut itself without distributing over the base of the device. Just curious - what did you use to find the center of the base? When I did it, I tried measuring with a ruler but the rounded edges really got in the way. For me it was part measuring and part eyeballing.
Posted by fiftyone_eggs 2. I used a longer bolt so that I could tighten the camera with a wingnut. This way I can point the camera wherever I want when I start. I also added a large washer for increased stability: http://www.marcree...ater_timer_top.jpg
Interesting solution. This makes a lot of sense, but what I did in this case was use the ball-head of my tripod to direct the camera.
Posted by fiftyone_eggs Findings:
So I took it for a test (just of my attic - not exciting enough to post a vid). I found that if I added my large, wide-angle lens to my Canon G9 the weight imbalance would cause the timer motor to pause here and there. It seemed to get hung up a little until it built up enough tourque to move forward. This resulted in some jerks in the final footage.
But with the big wide-angle lens removed, the motion was much more fluid and it was able to complete an entire turn without jerking.
So my lesson learned is: this works best with lightweight cameras. Judging from your photo, you hooked up a big camera and big lens to yours. Did this cause any inconsistencies in your movement?
I used a Canon T4i (1.14 lb) with a Tokina 11-16mm f/2.8 ultra wide angle lens (1.23 lb). This definitely puts a lot of stress on the device, but I did not notice any pauses - as you see the video is pretty much fluid. I think the fatal flaw in your design is the longer camera mount bolt. Since the lens weighs the entire thing down to one side, the longer bolt acts as a lever, multiplying the stress on the motor and creating more friction between the spinning cap and the track it rides on. Try using a shorter bolt without the wingnut and see how that works. In addition, you can attach a quick release plate to the top of the device like this for quick attachment.
Either way, great job! I'm looking forward to some test footage! Abandoned not Forgotten (Under Construction) Flickr | YouTube | Facebook Canon T4i | Tokina 11-16mm f/2.8 | Canon 50mm f/1.8 II | Manfrotto 190XPROB
Re: DIY Panning Timelapse Device Build Tutorial + Test Video <Reply # 18 on 1/25/2013 8:03 PM >
Posted by Abandoned not Forgotten
I think the fatal flaw in your design is the longer camera mount bolt. Since the lens weighs the entire thing down to one side, the longer bolt acts as a lever, multiplying the stress on the motor and creating more friction between the spinning cap and the track it rides on. Try using a shorter bolt without the wingnut and see how that works. In addition, you can attach a quick release plate to the top of the device like this for quick attachment.
I think that's exactly the issue. I'm going to shorten that bolt a little - although it will require me to pry that yellow top off again which is risky.
Edit: Regarding finding the center, I just eyeballed it. You just have to be carful not to get tricked by the fact that those screws aren't really equidistant. [last edit 1/25/2013 8:04 PM by fiftyone_eggs - edited 1 times]
Re: DIY Panning Timelapse Device Build Tutorial + Test Video <Reply # 19 on 1/25/2013 8:15 PM >
Posted by fiftyone_eggs I think that's exactly the issue. I'm going to shorten that bolt a little - although it will require me to pry that yellow top off again which is risky.
Yea I was shitting steam while prying that thing apart, but the second time should be easier. If you end up accidentally bending a part of the track you can just trim it like I did (see notch below).
Posted by fiftyone_eggs Edit: Regarding finding the center, I just eyeballed it. You just have to be carful not to get tricked by the fact that those screws aren't really equidistant.
It was definitely tricky; would have been much easier with 4 screws. [last edit 1/25/2013 8:16 PM by Abandoned not Forgotten - edited 1 times] Abandoned not Forgotten (Under Construction) Flickr | YouTube | Facebook Canon T4i | Tokina 11-16mm f/2.8 | Canon 50mm f/1.8 II | Manfrotto 190XPROB